So you want to make your own nail polish organizer at home. That’s dedication. Let’s put your motivation and free time to good use.
This step-by-step guide makes it easy to get things done. It lists a budget-friendly, beginner-friendly, logical approach to help you understand how to store nail polish collections by making an organizer for yourself.
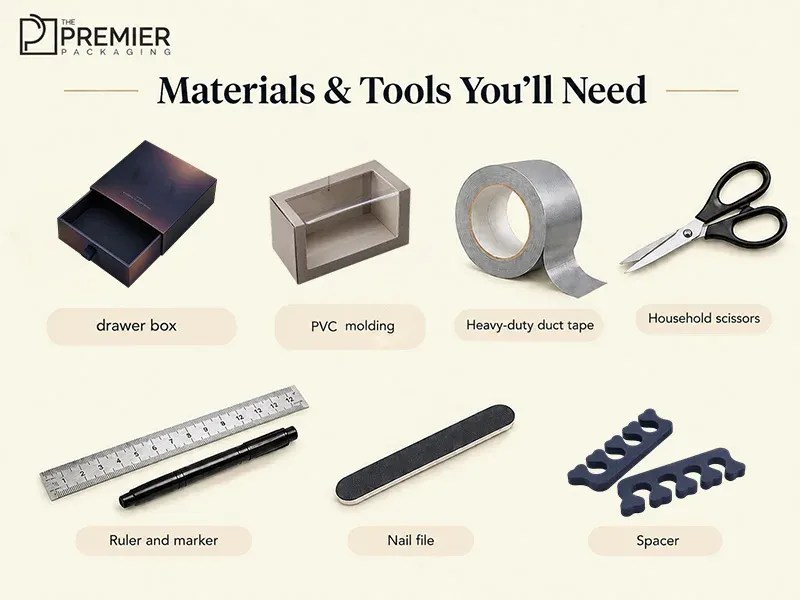
Materials & Tools You’ll Need
- Sturdy rigid box or cabinet drawer
- PVC corner molding (90-degree angle)
- Heavy-duty duct tape
- Household scissors
- Ruler and marker
- Nail file
- Spacer
Things to Know Before Making A Nail Polish Organizer
Choosing Your Box or Drawer
- The walls of the box hold the organizer together, so pick one that does not flex when you press on it.
- Make sure the inside depth is at least 3 inches (7.6 cm) so the drawer or lid can still close over your bottles.
Buying the PVC Molding
- You can find this in the building materials aisle of a hardware store. It is often labeled “outside corner molding” or “vinyl corner guard.”
- One standard 8-foot (2.44 m) piece is usually enough for most drawers.
- Look for molding that measures 2.5 to 3 inches (6.35 to 7.6 cm) on the wide side, and at least 1 inch (2.54 cm) on the narrow side. Do not worry if the narrow side is wider than 1 inch; you will cut it down later.
- Bring your tallest bottle to the store. Lay it against the wide side to make sure the 3-inch size is tall enough to hold it.
- Give the molding a gentle bend before buying. If it flexes a little, you can cut it with scissors. If it feels rock-hard, you will need a saw to cut it, so keep looking for a softer plastic.
Picking the Tape
- Avoid paper tape or standard craft tape. The glue is too weak to hold a full row of heavy bottles together.
Measuring and Cutting
- Standard U.S. kitchen cabinet drawers generally range from 12 to 36 inches wide, 20 to 22 inches deep, and vary in height from 3 to 12 inches.
- A standard 1-inch wide flat ruler makes marking easy. If your ruler is a different size, just mark 1 inch from the corner at both ends of the plastic and connect the dots.
- The plastic is thin enough that regular sturdy kitchen or utility scissors will cut through it easily.
- Use the nail file to smooth out the sharp plastic edges after you cut them.
Placing the Spacer
- When your rows are finished and placed in the drawer, there is usually a small gap left at the back. Put your spacer there so the rows do not slide around.
- If you use a slim box as a spacer, you can also use it to hold extra tools like nail files or cuticle sticks.
Let’s dive in straight towards the crux of this article i.e step by step instructions to DIY nail polish organizer at home.


1. Measure the Box and Calculate Your Supplies
First, measure the inside of your box or drawer. For example, let’s say the inside of your drawer is 9 inches wide by 15.5 inches long (22.9 x 39.4 cm). Decide which direction you want your polish bottles to face—this width (9 inches) will be the length of each plastic shelf, minus 1/8 inch (3 mm). That tiny bit of breathing room lets the pieces slide in without catching on the drawer walls, so each shelf ends up 8⅞ inches (22.5 cm) long.

Next, if you want to plan ahead and know exactly how much PVC molding to buy at the store, you can do a quick calculation. (If you hate math, you can just buy extra molding and eyeball it as you go!)
Because the L-shaped plastic sits at a slant inside the box, it forms a triangle with an invisible flat bottom. You need to know the width of that invisible bottom to see how many rows will fit in your box.
Step A: Find the width of one slanted shelf.
You don’t need to do geometry in your head. Just copy and paste a simple formula into the search engine bar.
Take the two side measurements of your PVC molding:
- One side will always be 1 inch (2.54 cm) (because you’ll trim it to exactly 1 inch)
- The other side is the depth of your shelf (let’s say 2.5 inches / 6.35 cm)
Type this directly into the search engine:
- For Inches: sqrt(1*1 + 2.5*2.5) (approx. 2.69 inches)
- For Centimeters: sqrt(2.54*2.54 + 6.35*6.35) (approx. 6.84 cm)
(Note: If your PVC shelf is 3 inches / 7.6 cm deep, just swap out the second set of numbers: sqrt(1*1 + 3*3), which gives you 3.16 inches / 8.03 cm.)
Step B: See how many rows fit in your box.
Take the length of your box and divide it by the number the search engine just gave you.
Always round down, even if you land on 5.9.
A row that’s even slightly too big won’t fit. Forcing it in would bend the whole structure.
For instance, take the example of our drawer:
15.5 divided by 2.69 = 5.76
This means you’ll make 5 rows (in centimeters, 39.4 / 6.84 = 5.76, so 5 rows).
The leftover 2 inches (5 cm) at the back is what the spacer is for.
Step C: Calculate the total PVC length to buy.
From previous calculation, its now clear that you need 5 rows, and each shelf is 8⅞ inches (22.5 cm) long.
So multiply: 5 x 8⅞ inches = about 44 inches (113 cm).
It’s worth adding one spare shelf, since the first cut is often the wobbliest.
That brings you to about 53 inches (1.35 m), still comfortably within one 8-foot length.
-
Mark and Cut the PVC Molding
Using your marker, draw straight lines on the inside of the PVC molding based on your measurements. Markings will stay hidden on the inside. Since the inside faces down in the finished organizer. So its ok if the ink marking gets messy.
If you have a flat 1-inch wide ruler, just press it flat against the narrower side, right into the inside corner of the plastic, and trace along the outer edge for a fast, straight line. That line is where you’ll trim the narrow side down to exactly 1 inch.
Use your scissors to cut across the molding first. Cut through one side, then the other, then snip through the corner, which is the stiffest part. Then trim the narrow side along your 1-inch line.
Before you cut all your pieces, cut just one and try it in the drawer. This quick test catches surprises while they’re still easy to fix.
Stand the piece up as a ridge and measure across the floor from its front edge to its back edge. For 2.5-inch molding, it should come to about 2.7 inches (6.8 cm), which confirms your row count. Then lay your tallest bottle on it and close the drawer to make sure it clears.
And finally, cut a second piece, stand it behind the first, and place a tall bottle on each. If the cap of the front bottle doesn’t bump the bottle behind it, you’re ready to cut the rest. You will end up with your set of shelves (5 in our example, plus your spare).
-
Smooth the Sharp Edges
Cutting PVC molding with household scissors can leave the plastic with jagged, sharp corners. To prevent accidental scratches take your standard nail file and quickly buff the cut edges of the plastic until surface is smooth. Spend a little extra time on the long trimmed edge of each 1-inch side. A long scissor cut is the hardest to keep perfectly straight, and smoothing it helps each ridge sit flat on the drawer floor.
-
Decorate Before You Tape
Before you tape everything together, take a few minutes to decorate your creation to your liking. It’s much easier now, while each piece is flat and you can wrap the edges neatly.
You can line the shelves with solid-color contact paper, pretty floral washi tape along the top edges, or marble or metallic contact paper to give them a luxurious feel. Contact paper also wipes clean. If a bottle ever leaks, you can peel off that one strip and replace it instead of redoing the whole organizer.
-
Tape the Ridges Together
Now you will build the ridged structure. Flip all your shelves upside down on a table so the insides face up. Line them up in order, all facing the same direction, with each piece’s 1-inch edge touching the next piece’s wide edge. And follow these steps:
- Apply the duct tape along each seam. Firmly press it onto the inside of both pieces, so the tape remains completely hidden once you flip it back over.
- One full-length strip per seam is enough. The tape works like a hinge, and the rest of the structure will be supported by the box’s walls.
- Keep taping shelf to shelf until you connect all your pieces. If the last ridge doesn’t fully fit, leave it off and let the spacer fill the gap.
-
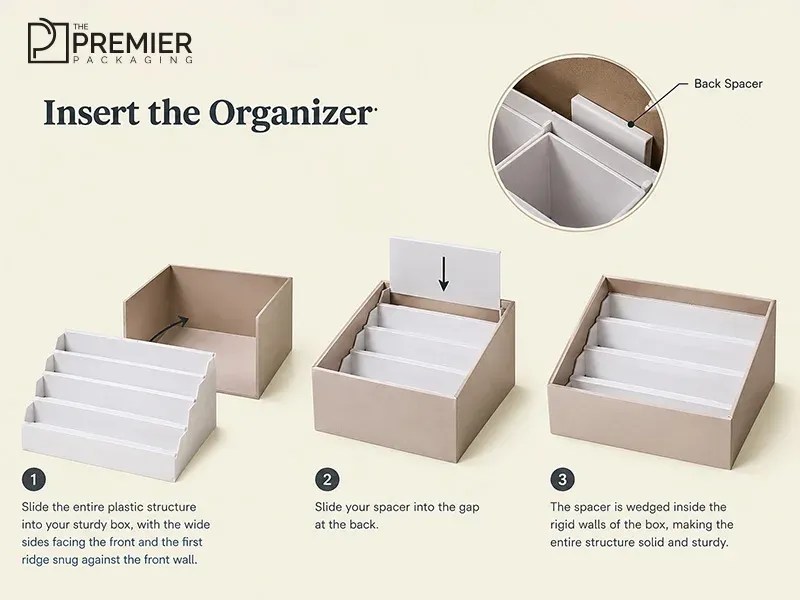
Insert the Organizer
One nuisance you will see is the slightly loose formation of the PVC structure. It’s completely normal.
Slide the entire plastic structure into your sturdy box, with the wide sides facing the front where you want your collection to face and the first ridge snug against the front wall.
Then slide your spacer into the gap at the back. As soon as it is wedged inside the rigid walls of the box, it will immediately become solid and sturdy.
-
Organize Your Collection
Start lining up your bottles on the new shelves. Each one lies on a slope, with its base resting against the ridge in front and the cap end tilted up toward the back. While this angled method takes up a little more space than simply tossing bottles into a box, the payoff is huge. Your entire collection is now perfectly grouped, securely in place, and fully visible at a single glance.
One thing to keep in mind if you do your nails nearby: most nail polish removers contain acetone, which softens plastic and breaks down tape glue. Keep the remover bottle in a separate spot, and wipe up any spills right away.

Wrapping Up the Article!
By following this guide, you’ll make a stylish organizer for your nail polish collections, which are otherwise sitting randomly in your drawer or bag.
Digging through a cluttered drawer or a deep bag to find that one specific shade of blush pink is annoying, and keeping the bottles upright to prevent spills is a constant battle.
So now you know how to solve these issues. All you need is to follow the instructions in this article to make a nail polish organizer at home.
Editorial note: This guide was made possible with the invaluable input of expert DIY enthusiasts who knows the art and science of making DIY custom packaging ideas come to life.
Share on:
Recent Update


Standard Greeting Card Size & Dimensions: A2 vs. A7 & Paper Yield Guide

Everything You Need to Know About Milk Carton Dimensions

Cereal Mascots: List of Cereal Advertising Characters

What Is a Cardboard? A Ridiculously Easy Guide