Making an origami box sounds easy until you try to turn a flat sheet of paper into a six-sided container.
This guide shows you how to fold a hexagonal box from origami paper, even if you’re new to paper crafts.
At first glance, the creases and folded sections of an origami hexagon box can look confusing, and one misaligned fold distorts the entire shape. That’s a problem when the box is meant as a gift, party favor, or small keepsake.
This guide shows you exactly:
- What to prepare
- Where to crease the paper
- How to collapse the creased paper into the finished hexagonal shape
What Is an Origami Hexagon Box?
An origami hexagon box is a small six-sided paper container folded into a geometric shape. Its six-sided design looks more decorative than a square origami box while still holding small items.
You can make one from ordinary origami paper or lightweight craft paper. One published version of the model, designed by Nick Robinson as an adaptation of a Shuzo Fujimoto design and published on Origami uses half of a square sheet, so a single square makes two boxes. Origami.me rates that version low-intermediate and lists a folding time of 20 minutes.
What You Need
- 1 square sheet of origami or lightweight paper (9.5 × 9.5 inches is a good size for learning the fold)
- Scissors or a paper cutter
- A flat, clean work surface
- Your fingernail or a bone folder for sharper creases
Procedure:
Avoid very thick cardstock for your first attempt, meaning anything much heavier than 100 grams per square meter of paper. For comparison, standard kami weighs about 60–63 grams per square meter. The finished model has several layers, and stiff paper makes the final folds difficult. Be sure to remember that a 9.5-inch square of sheet can make a box of about 2.4 × 2 × 1.2 inches (6 × 5 × 3 cm).
With the context in place, let’s focus on the how-to part of making a hexagon box from origami paper.
Step 1: Prepare the Paper
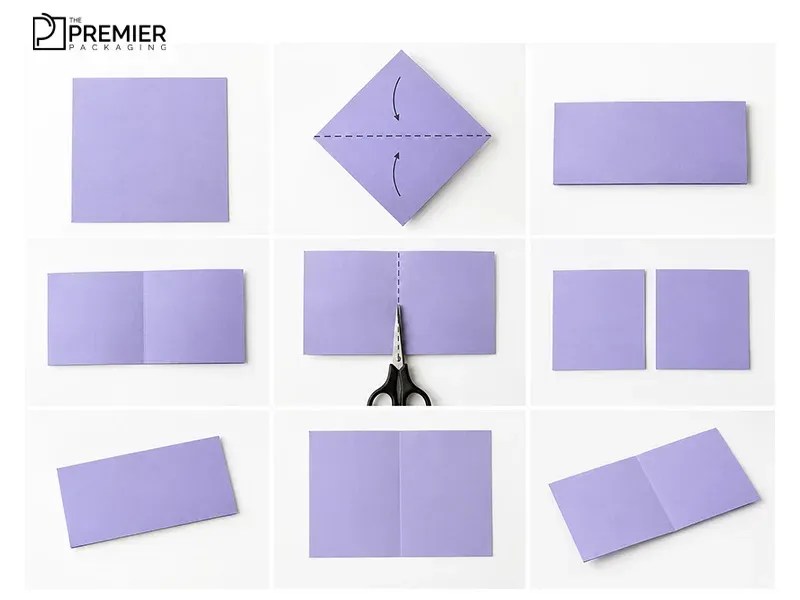
First, cut the square in half to make the rectangle you’ll fold into the box.
Then, place the square with the side you want on the outside facing down. Fold it in half vertically, edge to opposite edge, then unfold it to leave a crease through the center.
Make sure to cut along that crease. Set one of the two equal rectangles aside for a second box and use the other for your first. Starting from half a square is one reason this version is easier than some traditional hexagonal box designs.
Step 2: Build the Crease Pattern
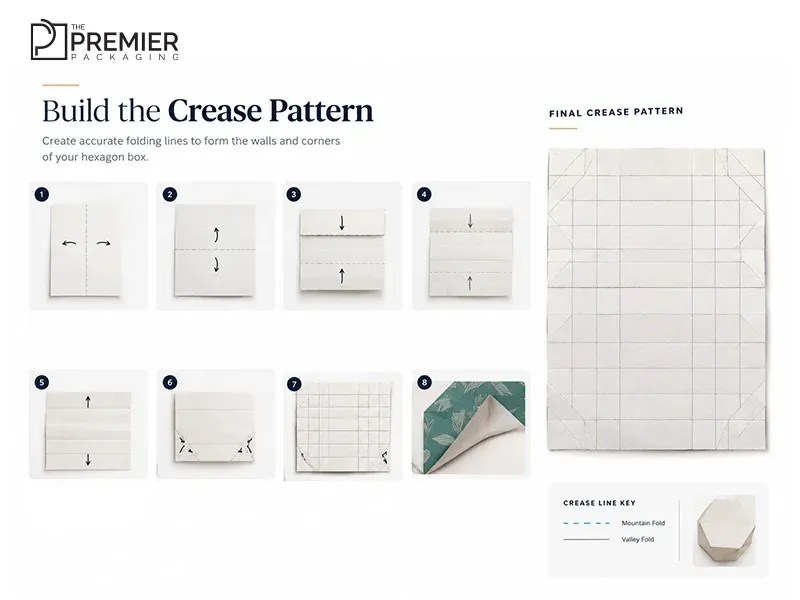
For our second step, you’ll first have to remember that you’re making the folding lines that will become the walls and corners of the box, so don’t try to form the box yet.
To avoid that design issue, please follow these steps:
- Fold the rectangle in half vertically, then unfold it.
- Fold it in half horizontally, then unfold it.
- Fold the top and bottom edges to the center crease, press them flat, then unfold them. Make a second set of folds using these new creases as guides, bringing each edge to the crease from the first set on its own side.
- Fold the bottom edge to the second crease from the top, then unfold. Fold the top edge to the second crease from the bottom, then unfold. The rectangle now has seven evenly spaced horizontal creases.
- Fold the diagonal creases at the lower corners. Start by folding the bottom-left corner to the marked reference point on the diagram, creasing only the left edge. Then fold and unfold one diagonal crease across each rectangular section. These creases let the paper collapse into the hexagon’s angled sides.
The sheet will now look like a complicated grid instead of a box, and that’s nothing to be afraid of. You haven’t ruined the design. Actually, that’s normal. Let’s head to the third step of this process.


Step 3: Create the Hexagonal Walls
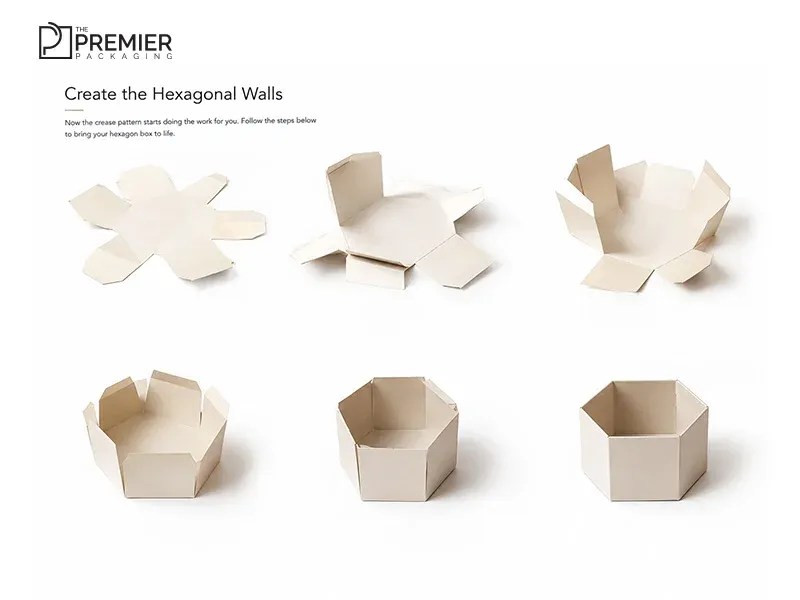
Because the crease pattern determines how the paper folds, you have to rotate the paper as needed and reinforce the vertical and diagonal creases. These creases mark where the six walls form.
Lift one section until it stands at a right angle to the adjacent section. Collapse the surrounding panels along the existing diagonal creases. Make sure not to force the paper into shape; it should move along the creases. Repeat around the remaining sections until the flat sheet becomes a three-dimensional container.
The folds get tighter as you work around the shape because more layers overlap.
If one side won’t sit flat, don’t press harder. What you can do is instead open that section slightly, check the nearby creases, and refold it along the original lines
Now let’s move to step four.
Step 4: Lock the Box Into Shape
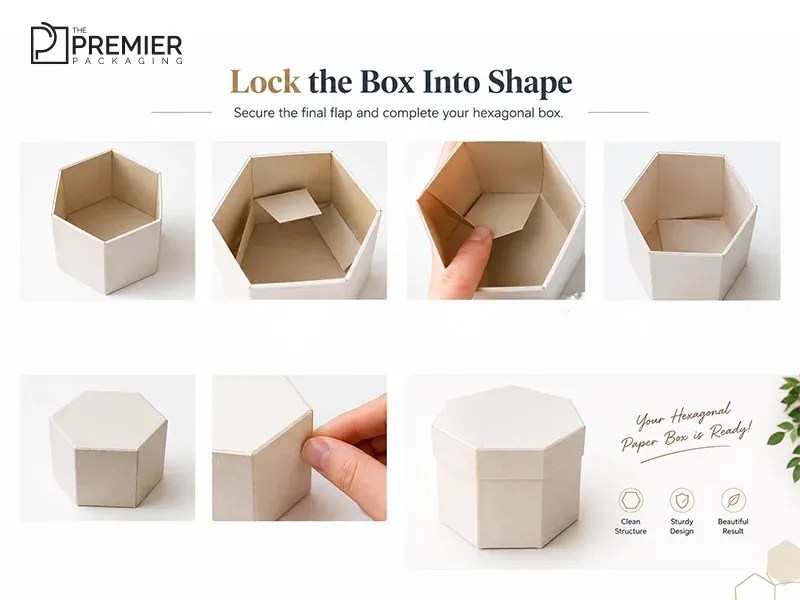
Once the six sides stand, lock the final overlapping section in place.
Turn the model over and look inside the box. Fold or swivel the flap inward along its existing creases.
This is often the hardest step for beginners because the paper is layered and the opening is small. Go slowly:
- Loosen the surrounding folds slightly if the flap sticks.
- Guide the flap into the inside of the box.
- Tuck one overlapping section underneath the other so the structure holds itself together.
You should now have a complete hexagonal paper box.
Step 5: Make a Matching Lid
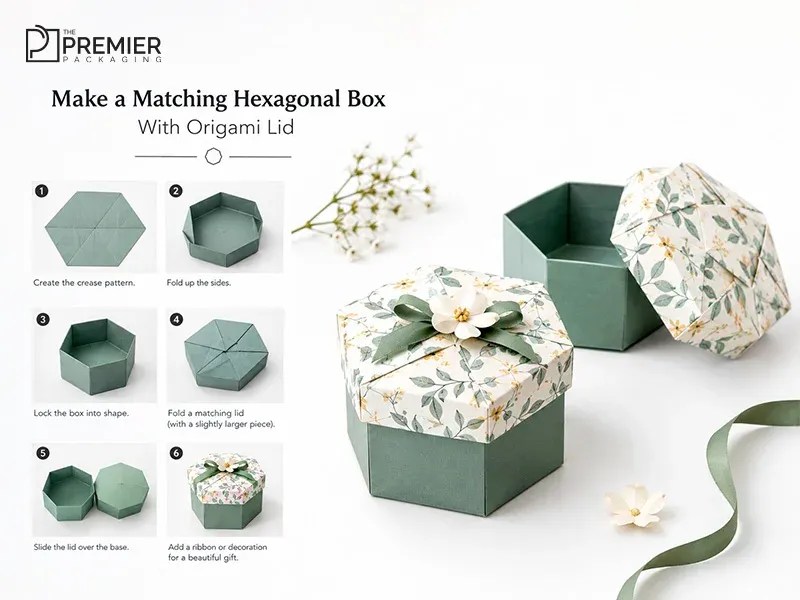
Because our guide includes a custom box with a lid, we’ll now proceed towards making a lid.
The lid must be slightly larger than the base so it slides over. Trim the base piece a few millimeters narrower on each side. Choose one approach:
- Fold the lid from the full half-square rectangle (9.5 × 4.75 inches when cut from a 9.5-inch square), and fold the base from a second rectangle trimmed a few millimeters narrower on each side.
- Make a shorter lid by folding in half the flap formed when the top edge is folded down to the horizontal centerline
For contrast, use one color for the base and a different pattern for the lid.
To turn the finished box into a handmade gift package, add any of these:
- A small paper flower
- A sticker
- A handwritten name
- A ribbon
Wrapping Up!
That’s it, folks. Hope you can inspire your next design craft when making a hexagon box from origami paper.
Also, we offer custom boxes in versatile layouts, including hexagonal shapes. So if you want to buy these custom boxes, The Premier Packaging is your place to find them.
Share on: